


Changing a tire isn’t only about handling a flat on the highway; drivers also change tires for wear, seasonal swaps, or rotations. In this article, you’ll learn how to handle all those scenarios, plus a focused section on changing a flat tire on a car safely on the roadside, the tools you need, and the checks you should follow after the process. By the end, you’ll feel confident tackling a tire change, wherever you are, and know when it's wiser to call a pro.
Table of Contents:
How to Change a Tire: Step-by-Step Guide
Follow the steps to change a tire: apply wheel chocks (wedges), loosen lug nuts slightly, position the jack under the manufacturer’s jack point, raise the vehicle, remove lug nuts and wheel, mount a replacement tire or spare, lower the vehicle gradually, remove the jack, and double-check the nuts. Set and ensure even tire pressure. Here is the full breakdown per step:

- Apply wheel chocks (wedges)
Place wheel chocks behind or in front of tires opposite the one you’re changing to prevent rolling. - Loosen lug nuts slightly
Turn counterclockwise (left) just enough to break initial resistance; don’t remove them yet. - Position the jack under the manufacturer’s jack point
Use your owner’s manual to find the correct spot. Ensure the jack base is stable. Use a wood plank beneath if the ground is soft. - Raise the vehicle
Lift until the wheel is a few inches off the ground (enough to spin freely and remove the tire). - Remove lug nuts and wheel
Take off the nuts fully, then pull the tire straight off. Set it aside flat so it won’t roll. - Mount a replacement tire or spare
Align the rim holes with the bolts and push gently but firmly; hand-tighten nuts to hold them. Learn more about Wheel Bolt Patterns. - Lower the vehicle gradually
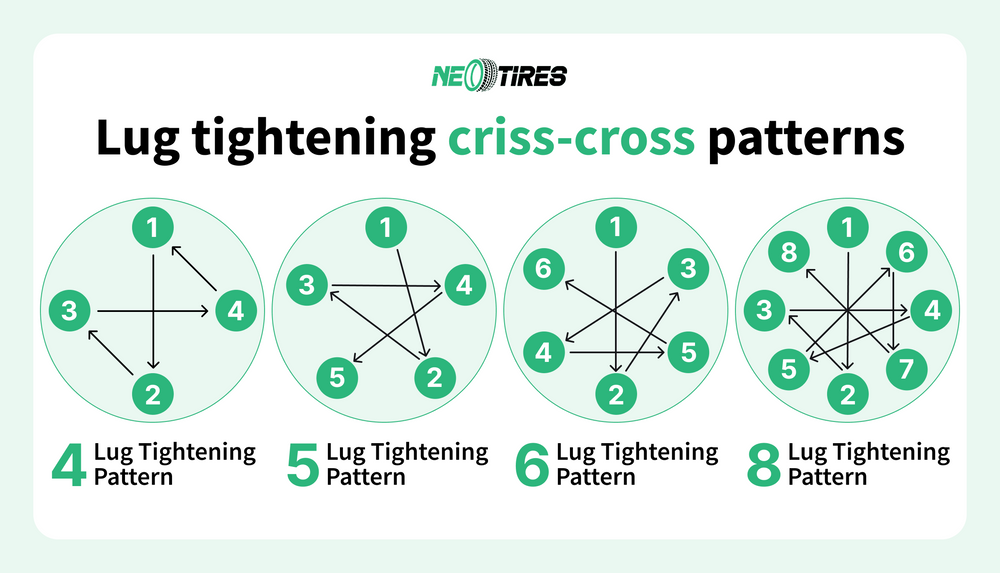
Lower the car until the tire touches the ground, but the full weight isn’t on it yet. - Tighten lug nuts in a star/crisscross pattern (as shown in the image below)
This ensures even pressure. Use full torque (follow the manufacturer's spec if you have a torque wrench). - Fully lower the car, remove the jack, and double-check the nuts
Re-tighten if necessary. - Set and ensure even tire pressure
Always check the new tire’s PSI and drive cautiously to a service shop if it is a spare.
What Tools Do You Need for Any Tire Change
A tire change generally requires five main tools: a jack/jack stands, wheel chocks (wedges), a pressure gauge, lug nuts, and a torque wrench. The items to have handy before the tire change include: the spare/replacement tire, gloves/flashlight, a mat, flashlight vest, and the owner’s manual, which can help make the process safer and easier.
| Tire Change Tools | Purpose / Notes |
| Spare tire/ replacement tire | Either a full-size spare or a compact “donut”, check its air pressure regularly |
| Jack/jack stands + handle | Use the correct jack point per vehicle manual. Use the correct jack point per vehicle manual. For home tire swaps, always support the vehicle with jack stands. |
| Lug wrench/torque wrench | For loosening/tightening lug nuts. Use a torque wrench (preferred for precision) to tighten to the manufacturer-specified torque. |
| Wheel chocks (wedges) | Prevents rolling, especially on slight inclines. Note: chocks are an extra safety measure, not a replacement for your parking brake. Always engage the parking brake first, then secure the opposite wheels with chocks. |
| Tire pressure gauge | To confirm PSI after installation. It is recommended to recheck when the tire cools. |
Table showing essential tools to change a tire on a car
| Items Needed for Tire Change | Purpose / Notes |
| Reflective triangle or vest | For roadside visibility |
| Gloves, flashlight, mat | Improve safety and comfort |
| Owner’s manual | Useful for model-specific jack points and nuts |
Table showing recommended items to have handy when changing a tire
Changing a Flat Tire on the Roadside: What's Different?
If you're dealing with a flat tire emergency, the core steps above still apply, but here's what's different when you're on the side of the road:
- Get off the road safely
Slow down gradually and pull to the shoulder or exit. Choose a straight, level area with good visibility. - Apply safety measures
Turn off the engine, engage the parking brake, and use cones or hazard triangles if available. - Loosen, raise, remove, mount, lower
As per the core steps above. - Check the spare tire pressure immediately
Many emergency spares (donuts) require higher pressure (typically ~60 PSI) to be safe. - Drive slowly to the service
Don’t exceed recommended speed and distance (often 50 mph for no longer than 50 miles for compact spares). Check how long you can drive on a spare tire in different scenarios.
How To Change a Tire If You Lack One or More Tools
Find safe substitutes and alternatives when you lack tools such as a wrench, wheel chocks, or a spare tire for changing a tire, in the table below:
✅ NeoTires Safety Note: Jacks have no real substitutes when changing a tire safely. The NHTSA emphasizes that jack stands and correct torque application are essential; skipping them can lead to wheel detachment or vehicle instability. The AAA further notes that most at-home tire incidents happen due to improper or makeshift tools. If you lack a torque wrench or stable jack stands, use the safe alternatives listed below only for stabilization or temporary fixes, and contact roadside assistance for lifting or tightening. Safety tools aren’t optional when working beneath or beside a raised vehicle.
| Tire Change Tool | Possible Alternative | How to Use It Safely |
| Wheel chocks/wedges | Large rocks, bricks, or wood blocks | Place firmly in front of or behind the tires on the opposite side of the car. Avoid round or unstable objects. |
| Jack | No safe DIY alternative. Call roadside assistance! | Never crawl under a car or lift it with makeshift supports (such as logs or bottle jacks not rated for vehicle weight). If the car must be lifted, call a pro. |
| Lug wrench | Cross wrench (4-way lug wrench) or breaker bar with matching socket | Ensure the tool fits all six sides of the lug nut snugly; loose fits can strip the nut. Never use pliers, vice grips, or adjustable wrenches* |
| Torque wrench | Lug wrench (emergency only) | Hand-tighten lug nuts in a star/crisscross pattern*** as firmly as possible** |
*Important: If you don't have a torque wrench, hand-tighten in a star pattern, then have a professional re-torque within 30 miles.
** Important: Improper torque can cause wheel detachment. This is an emergency-only solution. Drive immediately to the nearest service station (max 30 miles, under 50 mph) to have lug nuts torqued to manufacturer specifications. Check for looseness every 10 miles.
| Additional Items | Possible Alternative | How to Use It Safely |
| Wheel mat / kneeling pad | Old jacket, towel, or floor mat | Protects you from dirt or gravel when kneeling beside the car. |
| Flashlight | Phone flashlight (with battery saver mode) | Hold securely or prop with a bottle or shoe to free your hands. Avoid using it while traffic-facing; it can distract drivers. |
| Spare tire | Tire repair kit or portable inflator | For small punctures only. These can temporarily restore pressure so you can reach a shop, but are not replacements for a full tire change. |
*** Lug tightening criss-cross patterns for tires with different numbers of bolts are presented below:
What to Check After Changing a Tire on a Car
Go through these four checks after changing one or more tires (flat, new, or seasonal) to ensure you’re ready to hit the road safely:
- Check tire pressure on all wheels, including spare/ replacement tires.
- Re-torque lug nuts after about 30-60 miles, if you didn’t use a torque wrench initially.
- Watch for vibrations, pulling, or wobbles; these symptoms signal that something isn’t right.
- Inspect hub surfaces again to ensure no dust, rust, or debris caused an improper fit.
- Drive to the nearest service station if you mounted a donut tire to replace it with a regular tire.
When and Why You Might Need to Change Tires
Tire changes generally happen for four reasons: flat or puncture, wear or aging, seasonal swap, and rotation or mismatch. Here’s the breakdown:
- Flat or puncture: sudden loss of pressure or damage (nail in a tire, screw, blowout).
- Wear or aging: tread is too low, or tires are past their usable life based on DOT standards.
- Seasonal swap: switching summer ↔ winter or all-season sets.
- Rotation/mismatch: rotating tires to balance wear, or replacing a mismatched tire.
Official guidelines and measurements:
- The NHTSA and reputable tire makers recommend replacing tires every 6 to 10 years, regardless of tread, because rubber degrades naturally over time. For tread, AAA’s guidance suggests considering replacement when the tread drops to 4/32 inch, and replacing immediately at 2/32 inch. Learn how you can check your tread depth.
- NHTSA warns that tires with structural damage, bulges, or sidewall damage should not be repaired; replacement is the safest solution. Learn more about bulges in our dedicated article: Tire Bulges | Why They Happen and What To Do.
Tire Change: FAQs
How Long Does It Take to Change a Tire?
It takes 20-30 minutes to change a tire in most cases. The time depends on:
- The tools you have
- Your experience
- The situation (flat surface, lighting, traffic, and weather conditions)
- Your place (own garage vs roadside)
What is the 3% Rule for Tires?
The 3% rule means that when changing a tire, the new tire’s overall diameter should not differ from the vehicle’s original specification, or from the remaining tires, by more than 3%. This guideline ensures consistent rolling circumference, which is critical for accurate speedometer readings, proper ABS and traction control operation, and balanced handling.
If only one or two tires are replaced, exceeding this 3% difference can cause uneven wheel rotation, strain on the drivetrain (especially in all-wheel-drive vehicles), and potential safety or performance issues. The rule is widely cited by tire manufacturers and the NHTSA as a safe tolerance when fitting replacement tires.
Is Changing Tires Yourself Hard?
No, changing a tire on a car is not hard if you’re prepared. With a reliable jack, torque wrench, and jack stands, most drivers can handle a tire change in 20–30 minutes per wheel. The hardest part isn’t the work, it’s knowing the steps and having the right tools in your setup.
Can You Change Tires Yourself?
Yes, and many drivers do. Whether swapping winter and summer sets or replacing a worn tire, the process is straightforward if you have the right tools and space. According to AAA, most DIY tire issues happen due to missing tools or over-tightened lug nuts, not the difficulty of the job itself. With a torque wrench, jack stands, and proper guidance, changing tires yourself is entirely doable and saves a trip to the shop.
When You Should Let a Professional Handle It:
Call a pro when:
- You’re on a busy highway, in poor weather, or steep terrain.
- You lack essential tools (jack, wrench, torque).
- Your spare is missing or unusable.
- You feel unsafe doing it; there’s no shame in choosing safety.
Final Thoughts: Change Wisely, Drive Confidently
Changing tires isn’t a one-size-fits-all task. The right tools, patience, and safety awareness make all the difference whether you’re doing a routine swap, replacing old tires, or handling a flat in the middle of the road.
At NeoTires, we’re more than tire retailers; we’re your tire partner. When you're planning to change worn or seasonal tires, we can offer quality selections delivered at home or to your installer within 2-3 days, and expert support in tire size fitting. Drive safe and choose your tires wisely!
